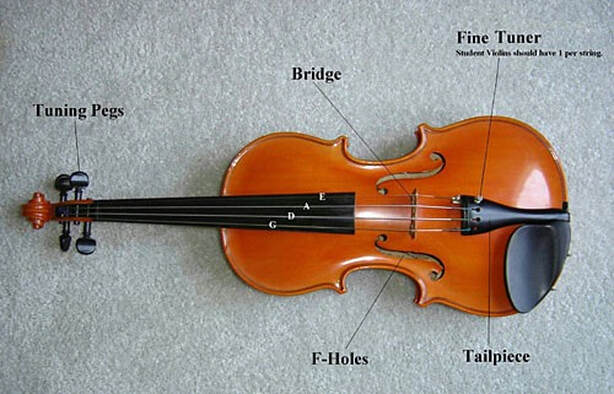
Parts of a Violin
Parts of a Violin Bow

Tuning Your Violin
Parent’s should tune their child’s instrument with the Fine Tuners (or pegs if you are comfortable and understand how) until the student is old enough to do it themselves. If you tune with the pegs and don’t understand how, you can break a string and/or the peg can “pop” and lose tension quickly. Please feel free to reach out to me for help.
The directions below are for an experienced tuner.
The directions below are for an experienced tuner.
|
1.
|
First, make sure your bridge is properly placed between the two small notches in the F-Holes. The bridge should lean back (towards the tailpiece) slightly, NOT forward - that is, not towards the fingerboard.
|
|
2.
|
Once the bridge is in place, you can begin to tune your violin starting with the pegs. You will need a tuning device to establish the correct pitch of each string.
|
|
|
3.
|
After using the pegs to get close to the pitch, you will use the fine tuners to make the final adjustments (Note: some violins only have one fine tuner on the E string). First look between the tuner and the top of the violin and make sure the fine tuner is not close or already touching your violin. If it is, turn the fine tuner counterclockwise (left) and re-adjust the pegs. Then continue with the fine tuner tuning.
|
|
Putting on a Violin/Viola Shoulder Pad
Once you’ve chosen the appropriate violin shoulder rest, it’s important to learn how to fit the shoulder rest on your violin.
As a popular shoulder rest option that can sometimes cause confusion, here are some brief tips on fitting the ‘footed’ type:
As a popular shoulder rest option that can sometimes cause confusion, here are some brief tips on fitting the ‘footed’ type:
- For the shoulder rests with feet, it is easiest to simply grasp the violin face-up in your left hand with the tailpiece facing back.
- Next with your right hand just slip the foot onto the edge and clamp it there with your index finger
- Then slide the right-hand foot over the top of the instrument and gently slide them both down to an angle that is both firm and comfortable
Posture
Correct Posture
It is very important to learn the correct positioning of the violin and bow from the start. Let's start with how to stand.
Standing Posture
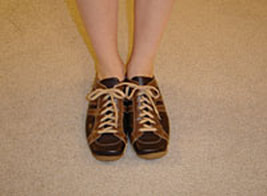
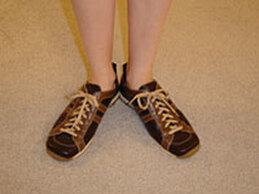
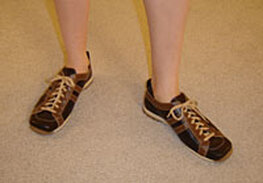
Stand tall with your feet placed together. Next, keep your heels together and separate the upper part of your feet. (Your feet should now look like a "V".) Now, keep your right foot in place and take one small step (about 4 inches) with your left foot, keeping the foot facing the same direction. This is how you should stand.
It is very important to learn the correct positioning of the violin and bow from the start. Let's start with how to stand.
Standing Posture
Stand tall with your feet placed together. Next, keep your heels together and separate the upper part of your feet. (Your feet should now look like a "V".) Now, keep your right foot in place and take one small step (about 4 inches) with your left foot, keeping the foot facing the same direction. This is how you should stand.
|
|
|
|
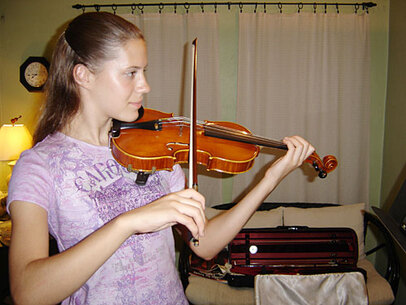
Violin Posture
I will describe different aspects in holding the violin. Then look below to the pictures to double check your positioning. In placing the violin under your neck on the chinrest (refer to violin diagram), I find it easiest to lift your head up and look to the sky. Place the violin on the left shoulder and then lower your head. When the violin is placed properly, your chin should sit in the chinrest on the violin. The violin should not be in front of you, over your belly, or straight out from your chin. It should be slightly to the left. Your violin should be parallel to the floor, not to high, not too low. Your left arm should never rest on your body. If it is, you should consider yourself a "fiddle" player! |
|
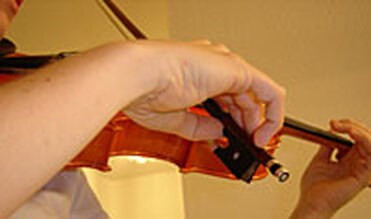
Bow Posture
The bow hold is a little tricky. But here is a little saying we teach young students to remember some key points of the bow hold.
Up like a rocket,
Down like the rain,
Back and forth like a choo choo train.
Round and round like the great big sun,
Put it on top of your head,
Bent pinky, curved thumb.
Now you're done.
The most important aspects of the bow hold are a curved thumb and a bent pinky.
So, let's do an exercise first. Take a sheet of notebook paper or a ball and pick it up off the floor. When you do this, you will notice that you pick the item up with your fingers, and it creates the shape of the object in your hand. This shows us the basic bow hold. Find the frog of the bow (refer to bow diagram). Place your curved thumb on the left side of the bow, just above the black part of the frog (looks like a black rectangle). Now your other fingers will wrap over the stick part of the bow and lay on the right side of the frog. The thumb and middle finger should be across from each other. All of the fingers go over the stick (wood) of the bow EXCEPT for the curved pinky which will stay on top. Here is a picture of a correct bow hold. Note that when the bow is being held properly, it creates a circle with the fingers.

|
|

|
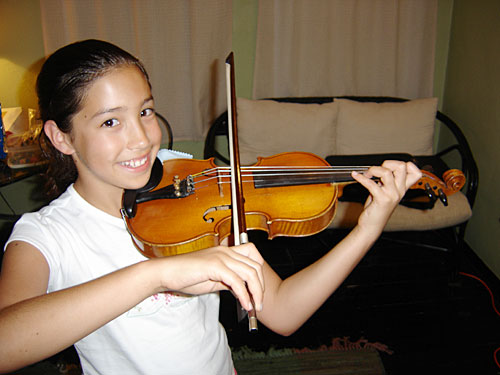
Bow Placement
When playing the violin, your bow should be in the middle, between the bridge and the fingerboard.
When playing the violin, your bow should be in the middle, between the bridge and the fingerboard.
|
|